Ray Marching
Tyler Bovenzi 2022
Introduction
Ray Marching
Ray Marching is a very different rendering technique that does not use polygons, billboards, or meshes. Rather, it uses signed distance functions to calculate the color of each pixel mathematically. While computationally expensive relative to traditional rendering techniques, it does offer some advantages and interesting properties.
Vertex and Fragment Shader
Ray Marching does not use VAO’s or any type of polygons. In fact, my implementation only used the vertex shader to create a rectangle that fills the window. Everything is done in the Fragment Shader where each pixel’s color is calculated independently.
Signed Distance Functions
For each pixel in view, the camera sends out a ray and calculates when it hits an object. From this information, we can calculate the distance to the object, the normal vector, and which object the ray collides with. To do this, the camera iterates over the length of the ray. During each iteration, the distance to the nearest object must be calculated. If this distance is under a certain threshold, the ray has hit an object, otherwise, the ray “marches” a length equal to the nearest distance.
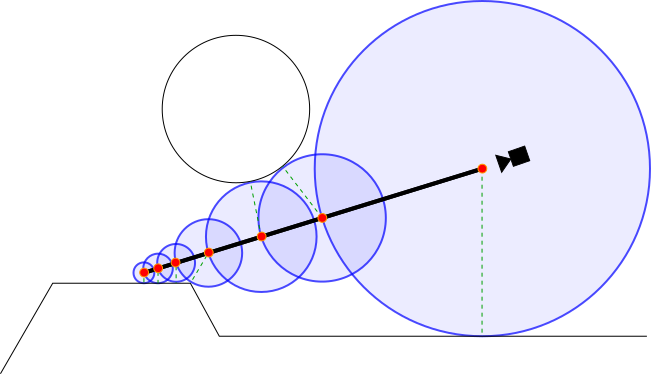
But how is the distance to the nearest object calculated? Simple. We calculate the distance to every object in the scene and then take the minimum. This can be very expensive when the distance needs to be calculated for every object the scene for every pixel in view. Different types of objects (ie spheres, cubes, cones, terrains) have different equations to calculate their distances from an arbitrary point. These are known as signed distance functions or SDFs. The word “signed” indicates that if the point is inside an object, the distance equation returns a negative value. For a basic SDF, consider a sphere
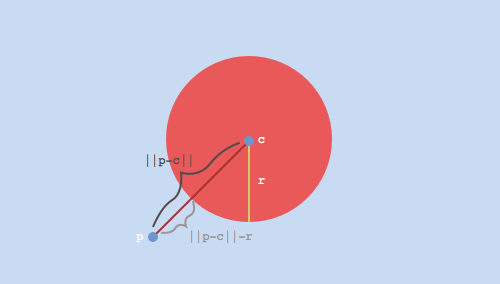
For a sphere, the closest distance to any point on the sphere is equal to the distance to the center, minus the radius. Note that for a point inside the sphere, the radius is larger than the distance to the center, thus the SDF returns a negative value.
Ray Generation
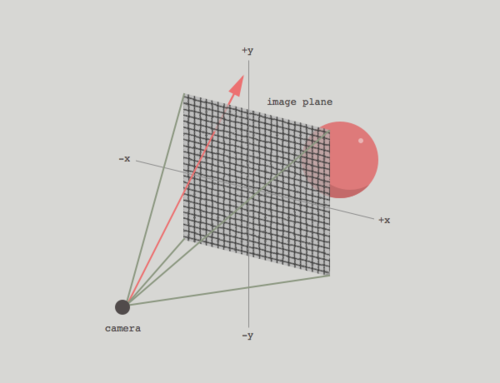
For every pixel rendered, the fragment shader must calculate a vector from the camera to cover a certain vertical and horizontal azimuth within view. These azimuths create what’s traditionally known as the field of view. In the diagram below, the vector to a pixel in red while the field of view is bounded by green lines.
Consider the following code for calculating the vector from the camera to each pixel
vec3 rayDirection(float fieldOfView, vec2 res, vec2 fragCoord) {
	vec2 xy = fragCoord - res / 2.0;
	float z = res.y / tan(radians(fieldOfView) / 2.0);
	return normalize(vec3(xy, -z));
}
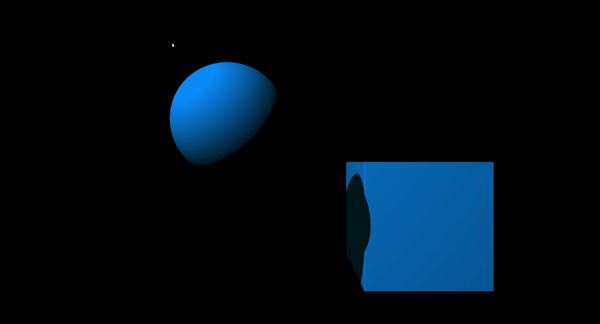
Distance Shading
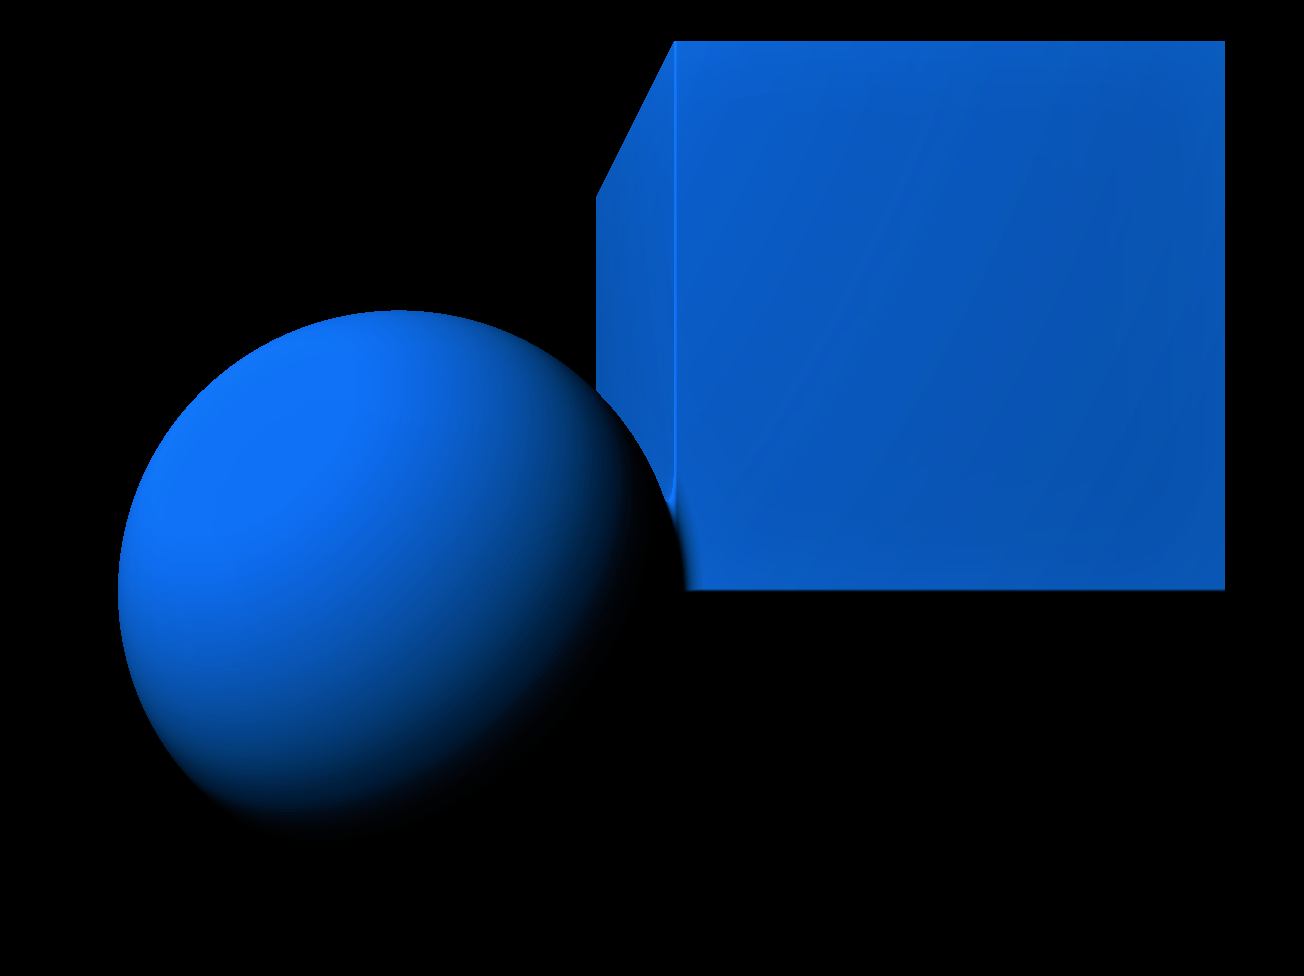
Once the Ray Marching loop is up and running, we can color the scene based on the distance to the object. In the image below, I calculate the distance for every pixel, and if its under a threshold, I color it blue. With a sphere and cube, this creates a basic scene where one can make out the shape of the objects without any shading or shadows.

Diffuse Shading
With the position of the camera, angle of the ray direction, and distance, its easy to calculate the position of every ray collision.
It is also possible to obtain the normal vector from a surface by calculating the distance to points offset by a small amount. Consider the following code:
vec3 GetNormal(vec3 position)
{
	float distance = GetDist(p);
	vec2 epsilon = vec2(.01,0);
	vec3 n = distance - vec3(
		GetDist(position-epsilon.xyy), //X Component
		GetDist(position-epsilon.yxy), //Y Component
		GetDist(position-epsilon.yyx)  //Z Component
	);

	return normalize(n);
}
With surface normals, and lighting positions, we can add simple diffuse lighting to the scene:
Shadows
Once we have the position of every visible point on a surface, we can implement shadows by ray marching for a second time. This time, instead of marching a ray from the camera to the object, we instead march from the object towards the light source. If this ray collides with another object before hitting a light source, we know there is another object blocking the light and can therefore draw a shadow for that pixel. Note that this requires more performance since it adds more ray marching steps.
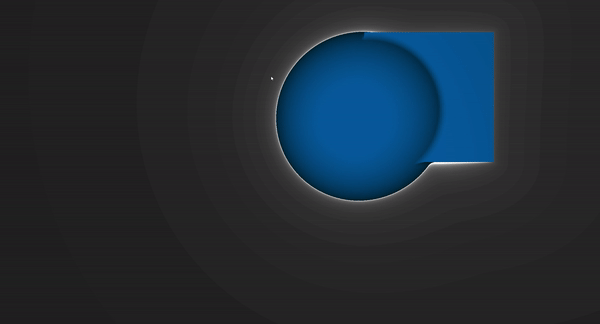
Outlines
Unlike shadows, which are somewhat computationally intensive, outlines come effectively free with the ray marching loop. The distance the ray marches is inversely proportional to the distance from the object. In other words, since the distance of each iteration decreases near the object, there are more iterations closer to an object’s surface. If we count the total number of iterations for each pixel, it yields a nice outline shading effect. Note that for the image below, color was set to zero if the ray actually hits an object.
Since ray iterations are the bulk of the computational work done, this also shows the performance required for each pixel, where darker pixels are less expensive.

Smooth Minimum
In an earlier section, I explained that the nearest distance can be found by taking the minimum from an array of distances to every object. This has the effect of distinct objects with clear cut boundaries. It’s also possible to blend objects together by smoothing out the minimum function. I won’t go into too much detail of how this works but there’s a great article by Inigo Quilez on his website. In essence, the smooth min function takes a parameter that can be increased to modify the degree to which objects are blended together. If this parameter is negative, only the intersection between given objects is shown.
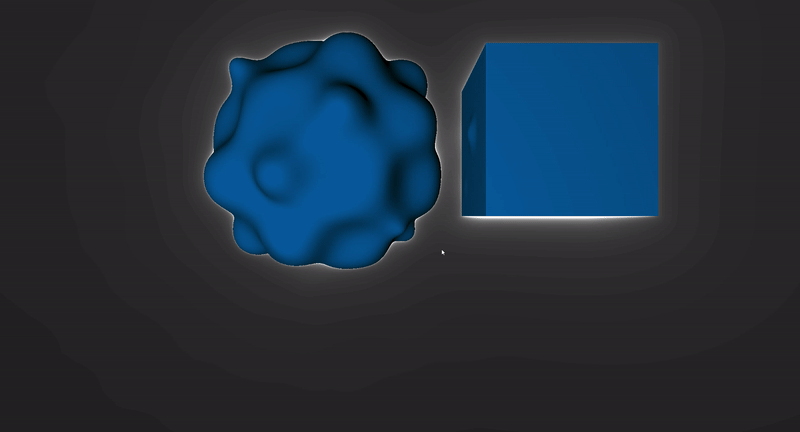
Distortion
The SDF for an object provides a precise distance to the object’s surface. We can slightly distort this distance to gain an interesting shape at the expensive of precision and geometric uniformity. In the demonstration below, I add a sinusoidal noise pattern to the surface of the sphere.
Transparency
In all of the scenes so far, the ray marching stops once we hit an object, but what if we continued iterating the ray after reaching the object’s surface.

Once the ray enters an object (the SDF is negative), we can increment through the object’s volume, keeping track of how many ray steps are within the media.
Terrain
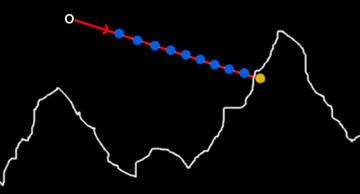
3D objects are great and have a lot of potential for interesting scenes. I also wanted to investigate terrain as it can be also be used to create immersive scenes. With terrain, we start with need some equation to determine the height for a given point.
Using this equation, we can again step along a ray, stopping when we collide with the terrain. For each step, we know the height of the point in space.
We can compare this to the height of the terrain to find the distance off the ground.
When this value is lower than a certain threshold, the ray has hit terrain.
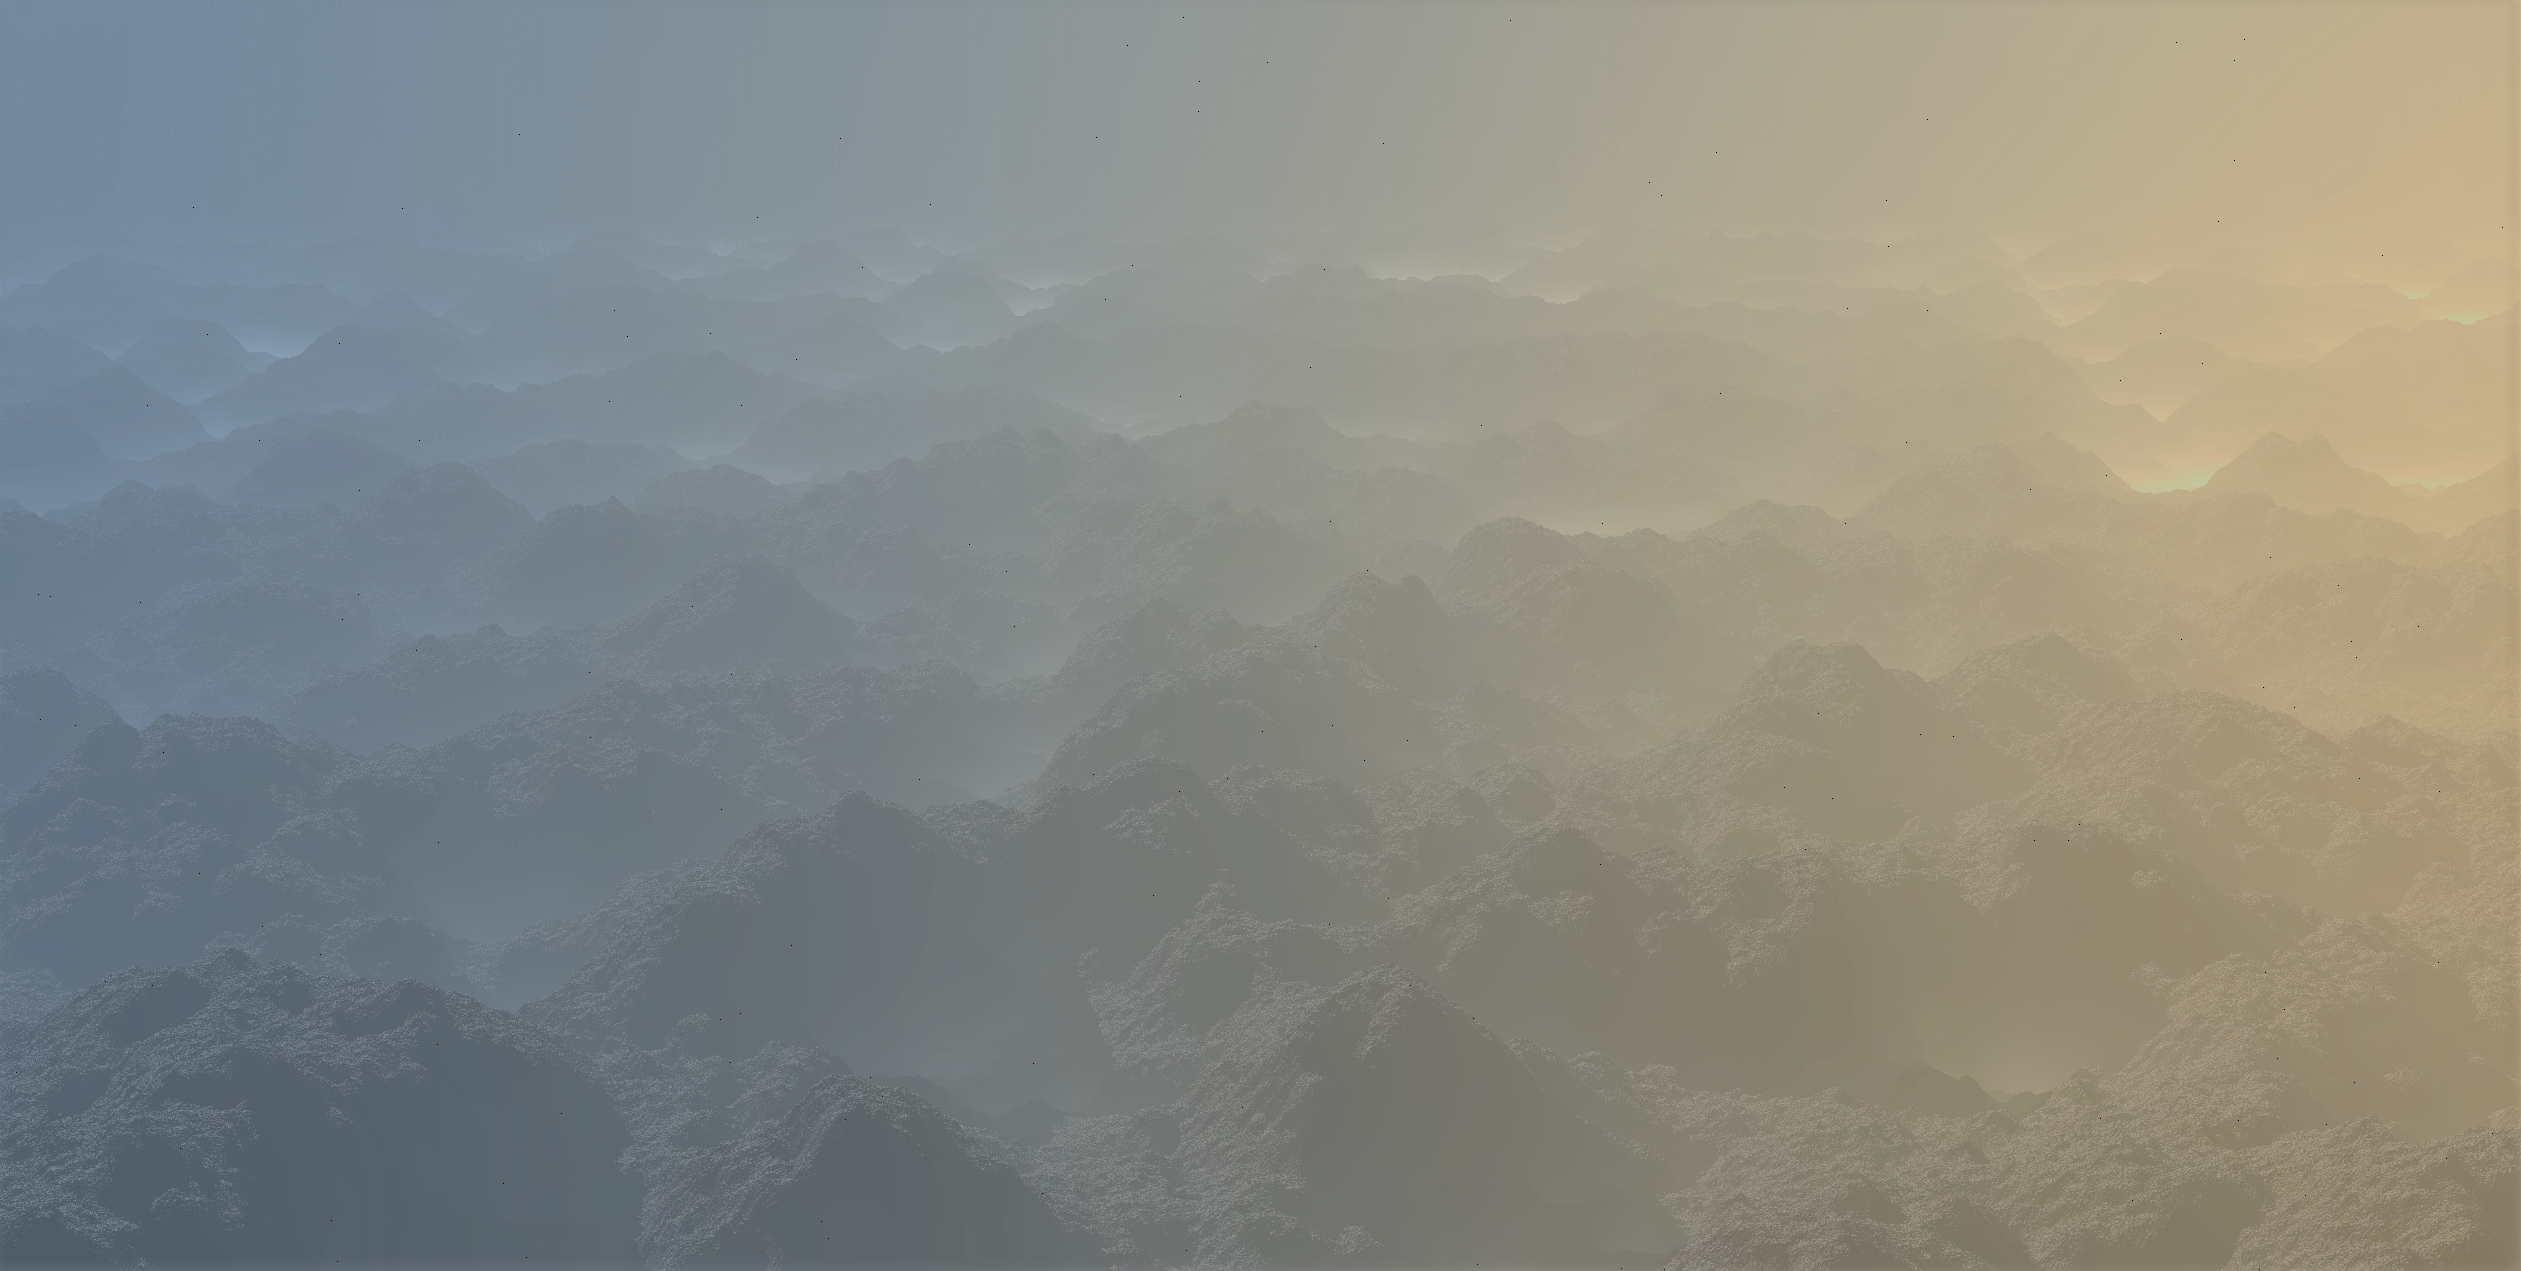
Ray Marched Terrain vs Mesh Terrain
There are benefits and drawbacks to both methods of drawing terrain. First, mesh based terrain is much less computationally expensive and can therefore run at a higher framerate. Ray Marched Terrain can store nearly limitless detail as every pixel is calculated using a precise distance equation where a mesh has a finite number of polygons that limits the terrain resolution.
Conclusion
In this project, I learned much about basic ray marching effects and implemented a few different techniques to create a variety of interesting effects. While I learned a lot, I feel like there’s a lot more to develop using the methods I worked with. For example, I’d be interested in adding volumetric clouds or bodies of water into my terrain project using the transparency effects I developed.
If you have any interest in this project, or would like to learn more, please contact me:
Tyler Bovenzi
tbovenzi@calpoly.edu
Controls
Primitives Playground
- WASD to move sphere
- 1, 2, and 3 to cycle scenes
- 4 and 5 to enable/disable sphere noise
- R and F to increase/decrease blending factor
Terrain
- Mouse to pan camera
- W/S for forward and back
- R and F to increase/decrease render distance
Sources:
- “Adrian's Soapbox.” Raymarching Distance Fields: Concepts and Implementation in Unity, https://adrianb.io/2016/10/01/raymarching.html.
- “Ray Marching.” Michael Walczyk, https://michaelwalczyk.com/blog-ray-marching.html.
- “Creating a Volumetric Ray Marcher”, https://shaderbits.com/blog/creating-volumetric-ray-marcher.
- Quilez, Inigo. Inigo Quilez, https://www.iquilezles.org/www/articles/terrainmarching/terrainmarching.htm.